Inspector
The Inspector is a panel that contains editable node & scene properties. The Inspector is contextually aware, so it changes based on your selection.
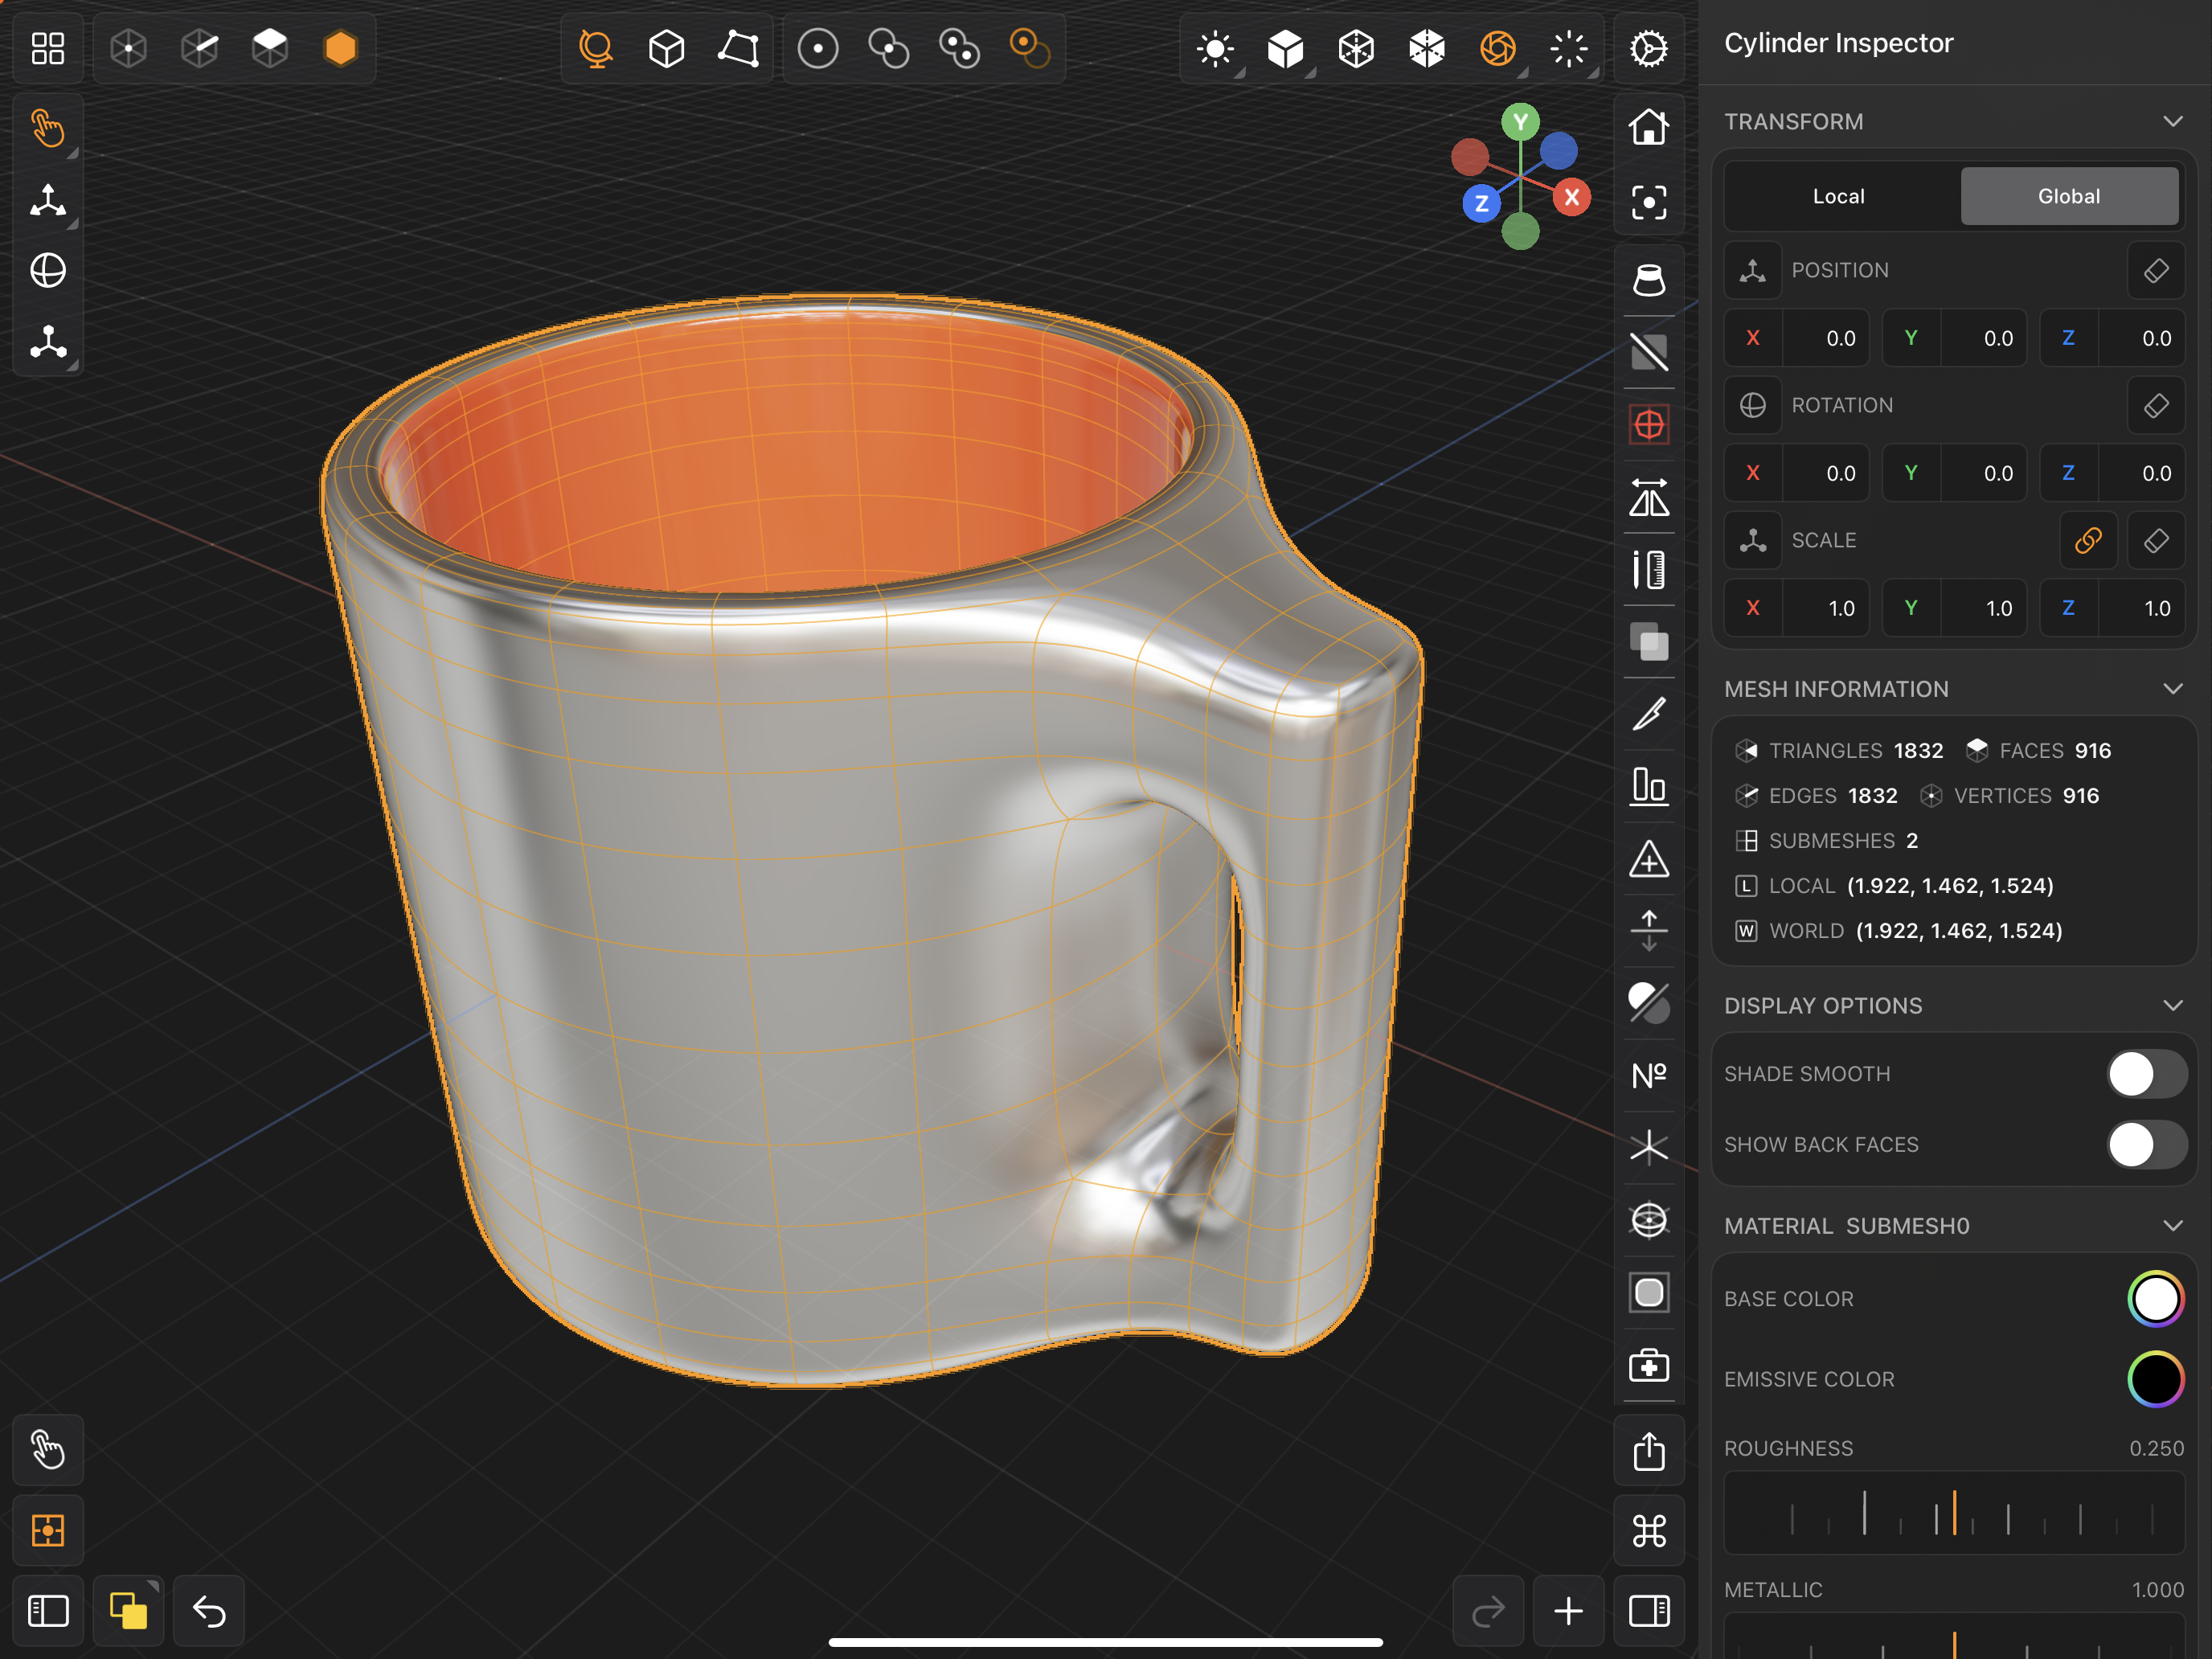
If you have a mesh selected or if you're editing one of the mesh's components (faces, edges or vertices), then the Inspector will show various node properties (see below).
Node Inspector
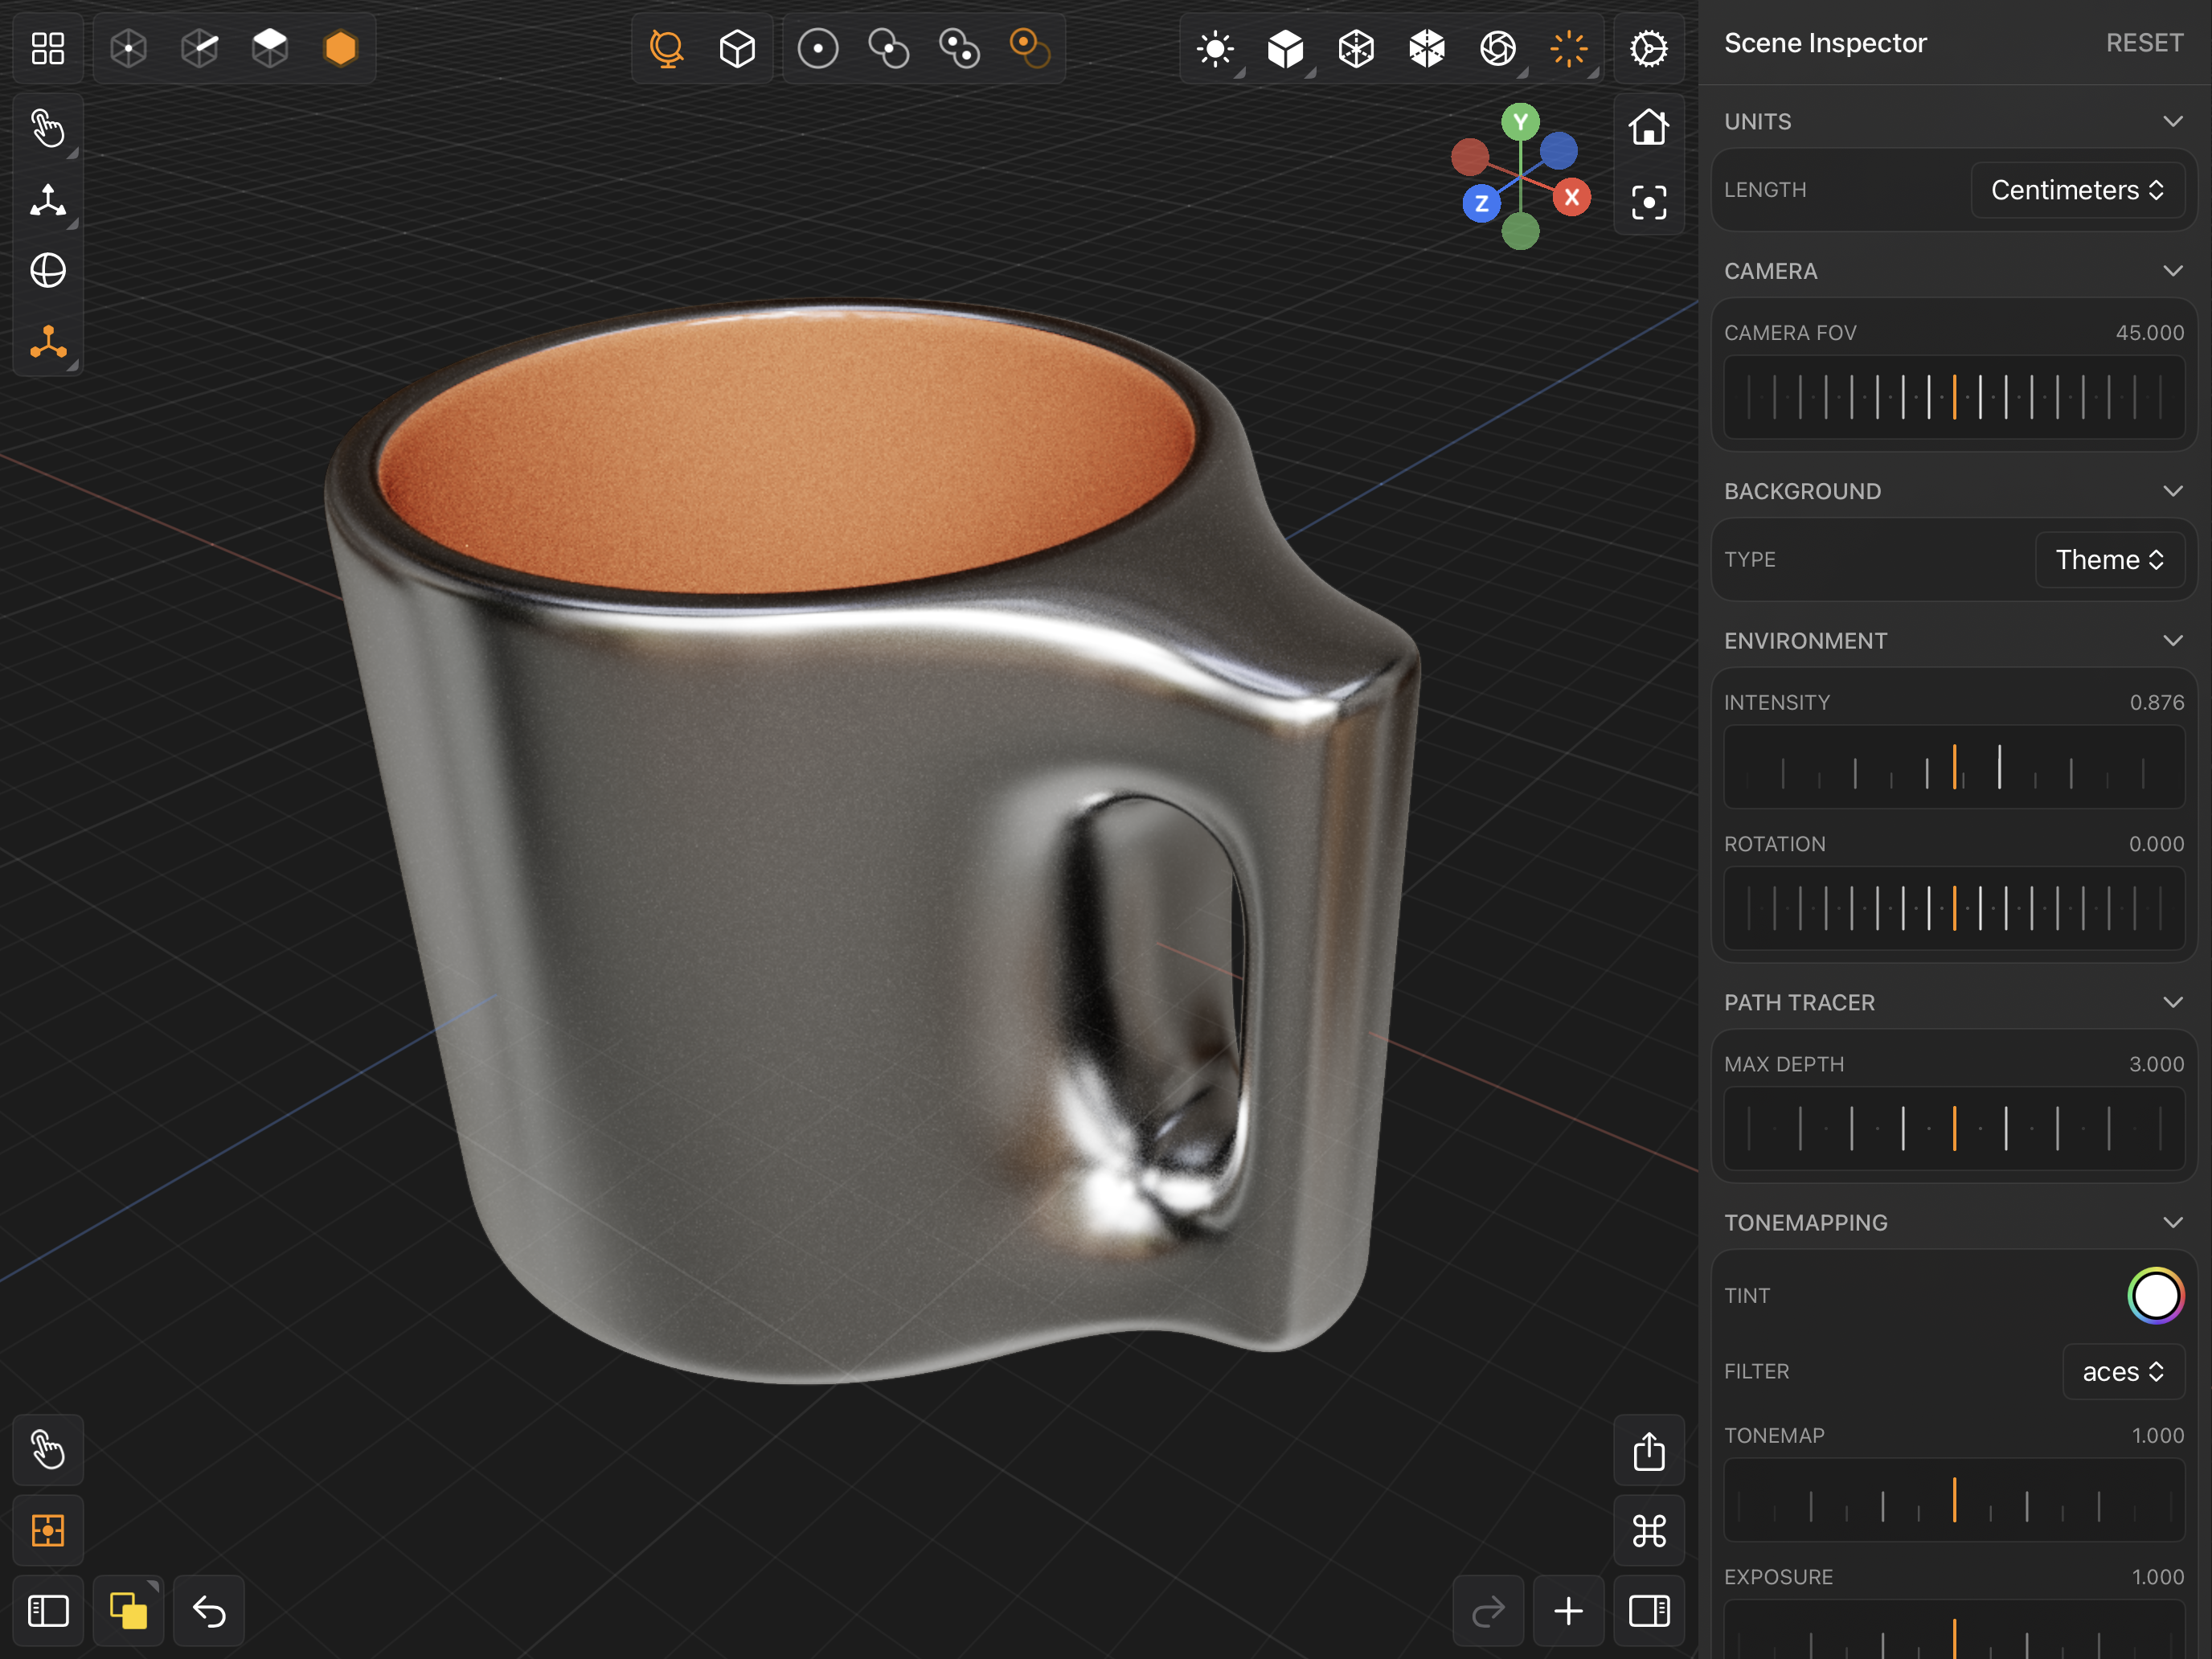
Alternatively, if you have nothing selected and your active Component Selection is set to Mesh, then the Inspector will show scene properties.
Scene Inspector
Modeler Interface
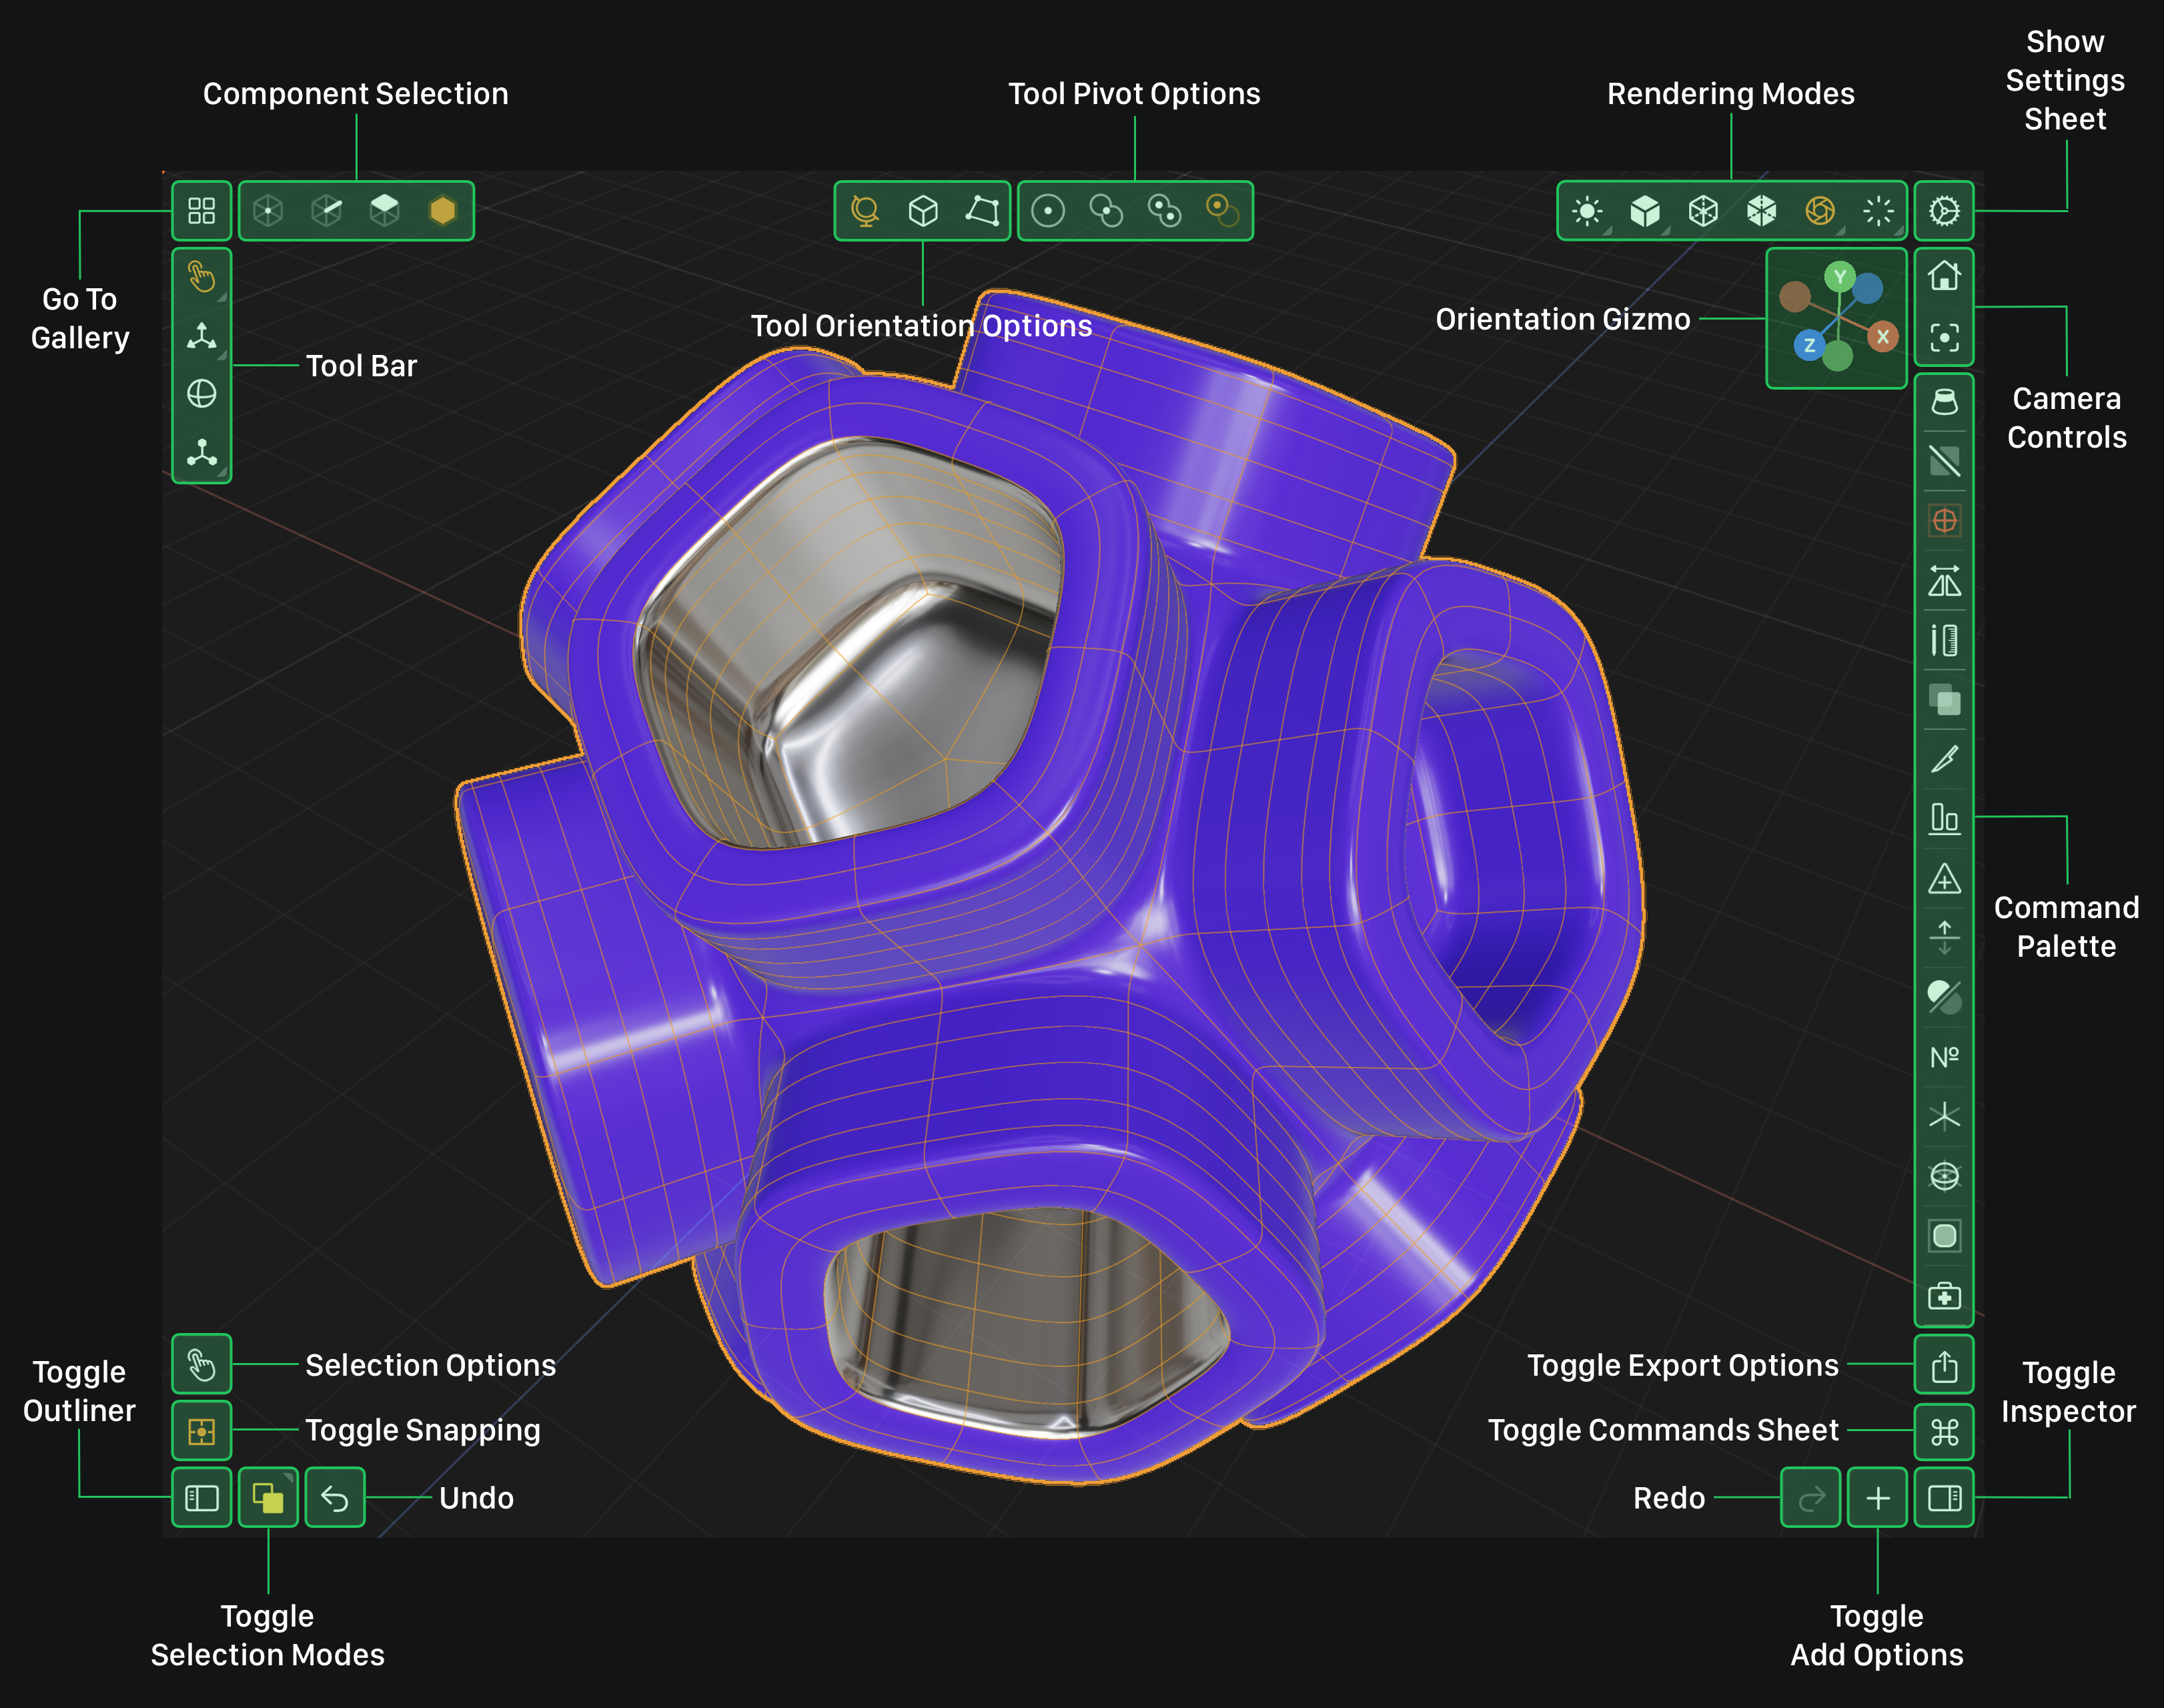
If you are on iPad, toggle the Inspector by tapping the Toggle Inspector button located near the bottom right corner of the screen.
Tap this button on iPad to show / hide the Inspector.
If you are on iPhone, toggle the Inspector by tapping on the Toggle Inspector button located near the bottom right corner of the screen.
Tap this button on iPhone to show / hide the Inspector.
On iPhone, instead of a panel, the Inspector is a modal sheet that is expandable. Drag the sheet up or down to see more or less. The modal sheet is also scrollable.
Node Inspector
When you have a node (which could be a mesh, image / photo reference, empty node, etc) selected, the Inspector will show various node properties (Node Inspector). You can use the Node Inspector to view and edit those properties. The sections below outline how to use different sections in the Node Inspector.
Toggle Node Inspector
If you double tap on a mesh (when the active Component Selection is set to Mesh), this will toggle the Inspector. So if the inspector is not showing, then it will emerge from the right edge of the screen. If the Inspector is showing and you've double tapped on a mesh, then it disappear into the right edge of the screen (see below).
Name
At the top of the Node Inspector, you'll see the name of the selected node (active component if you have multiple nodes selected) post-fixed with "Inspector". If you double tap on the name, a modal popup will show up with a text input field. You can use this input field to set the name of the node.
Transform
The TRANSFORM section of the Node Inspector is where you can view, copy, link, set and reset a node's position, rotation, and scale.
Local vs Global
When you have a complex scene hierarchy where nodes are child of other nodes. Sometimes its easier to use a node's local coordinate space verses it's global coordinate space. The segmented picker at the top of the TRANSFORM section allows you to set which coordinate space is easiest to work with given your desired outcome. Simply tap on the coordinate space you'd like to use and the values displayed in the position, rotation and scale will change to reflect the node's transform in that space.
Position
You can set a node's position using the text input fields in the POSITION section within the TRANSFORM section. Tap on the desired component value and type in a new value. You can also touch down and drag any of the component label's to change the value continuously.
Tap this button to copy the node's position values.
Tap this button to reset the node's position.
Touch and drag this button to change the node's x position.
Touch and drag this button to change the node's y position.
Touch and drag this button to change the node's z position.
Rotation
You can set a node's rotation using the text input fields in the ROTATION section within the TRANSFORM section. Tap on the desired component value and type in a new value. The rotation numbers shown are in degrees. You can also touch down and drag any of the component label's to change the value continuously.
Tap this button to copy the node's rotation values.
Tap this button to reset the node's rotation.
Touch and drag this button to change the node's rotation around the x-axis.
Touch and drag this button to change the node's rotation around the y-axis.
Touch and drag this button to change the node's rotation around the z-axis.
Scale
You can set a node's scale using the text input fields in the SCALE section within the TRANSFORM section. Tap on the desired component value and type in a new value. The rotation numbers shown are in degrees. You can also touch down and drag any of the component label's to change the value continuously.
Tap this button to copy the node's scale values.
Tap this button to reset the node's scale.
Tap this button to link the node's x, y and z scale value.
When the scale's x, y and z values are linked, the link button above will be tinted orange.
Touch and drag this button to change the node's x scale.
Touch and drag this button to change the node's y scale.
Touch and drag this button to change the node's z scale.
Only positive values are allowed at the moment for a node's scale.
Display Options
The DISPLAY OPTIONS section contains settings that affect how a mesh or image reference is rendered.
Shade Smooth
When you have a mesh selected, by default SHADE SMOOTH will be off. This will render the mesh such that it looks faceted. You can turn SHADE SMOOTH on and it will then render the model using vertex normals instead of face normals. The final shading rendered on screen is determined by this toggle, whether faces or edges in the mesh have been hardened and whether there is a Subdivision Modifier on the mesh. If there is a subdivision modifier on the mesh, then it will shade smooth regardless of the state of the SHADE SMOOTH toggle.
Show Back Faces
Sometimes its useful to display back faces. By default, SHOW BACK FACES is off. Turning it on will result in worst rendering performance for meshes that have a high polyon count.
Material
The MATERIAL section contains various material properties that are tweakable. This section is contextually aware and changes based on the Rendering Mode selected. So if you have selected an image reference, then it will show material properties for the image reference instead of a mesh.
When you have a mesh selected and the rendering mode is set to Physically Based or Path Traced you can edit the material's physically based rendering parameters (see below).
Modifiers
The MODIFIERS section contains various modifier properties that are tweakable. This section is contextually aware and changes based on the modifiers on a mesh. So if there are no modifiers on the selected mesh, then the MODIFIERS section will not appear. This section is where you'll be able to tweak modifier parameters and apply the modifier as well.
Tap this button to turn the modifier on
Tap this button to turn the modifier off
Tap this button to remove the modifier.
You can apply the modifier by tapping on the green apply button inside the modifier's group.
Scene Inspector
When you have a nothing selected, the Inspector will show various scene properties (Scene Inspector). You can use the Scene Inspector to view and edit those properties. The sections below outline how to use different sections in the Scene Inspector.
Toggle Scene Inspector
If you double tap on the background (when the active Component Selection is Mesh), this will clear the selection and toggle the Scene Inspector (see below). So if the inspector is not showing, then it will emerge from the right edge of the screen. If the Inspector is showing and you've double tapped on a mesh, then it disappear into the right edge of the screen (see below).

Camera
The CAMERA settings allow you to change the camera's field of view. By default the camera's field of view is 45 degrees. You can change the field of view by using the CAMERA FOV slider.
Background
The BACKGROUND settings allow you to change the background of the scene. By default the scene's background TYPE is set to Theme. The Theme setting sets the background to a solid color based on the Theme Settings.
Another option for the background type is Color. When set, you can specify the color usingthe color picker below the background type menu.

The last option for the background type is Environment. When set, the scene's background will be the built-in HDRI used to light the scene. You can specify how blurry the background is using the slider below the background type menu.

Environment
The ENVIRONMENT settings allow you to change the INTENSITY and ROTATION of the High Dynamic Range Image based lighting. By default the INTENSITY is set to 0.5 and the ROTATION is set to 0.0 degrees.